- 公開日
- 最終更新日
【SageMaker】SageMakerエンドポイントへのYOLOv8のデプロイ
この記事を共有する

目次
はじめに
はじめまして。パーソル&サーバーワークスの村上です。
最近、Amazon SageMaker JumpStartに触れて、学習済みモデルを簡単に素早くデプロイ出来ることに感動していました。
ですがAmazon SageMaker JumpStartでは提供されていない学習済みモデルもあるので、今回はAmazon SageMaker JumpStartを使わずAmazon SageMakerの推論エンドポイントにモデルをデプロイしていこうと思います。
その際に、ローカル環境での検証からデプロイ、デプロイ後の検証までを試してみましたので、本記事で検証手順を記載します。
デプロイするモデル
今回デプロイするモデルはUltralytics社が開発している物体検出モデルのYOLOv8になります。
環境
OS: Amazon Linux 2023
Python: 3.11.6
流れ / 全体のイメージ
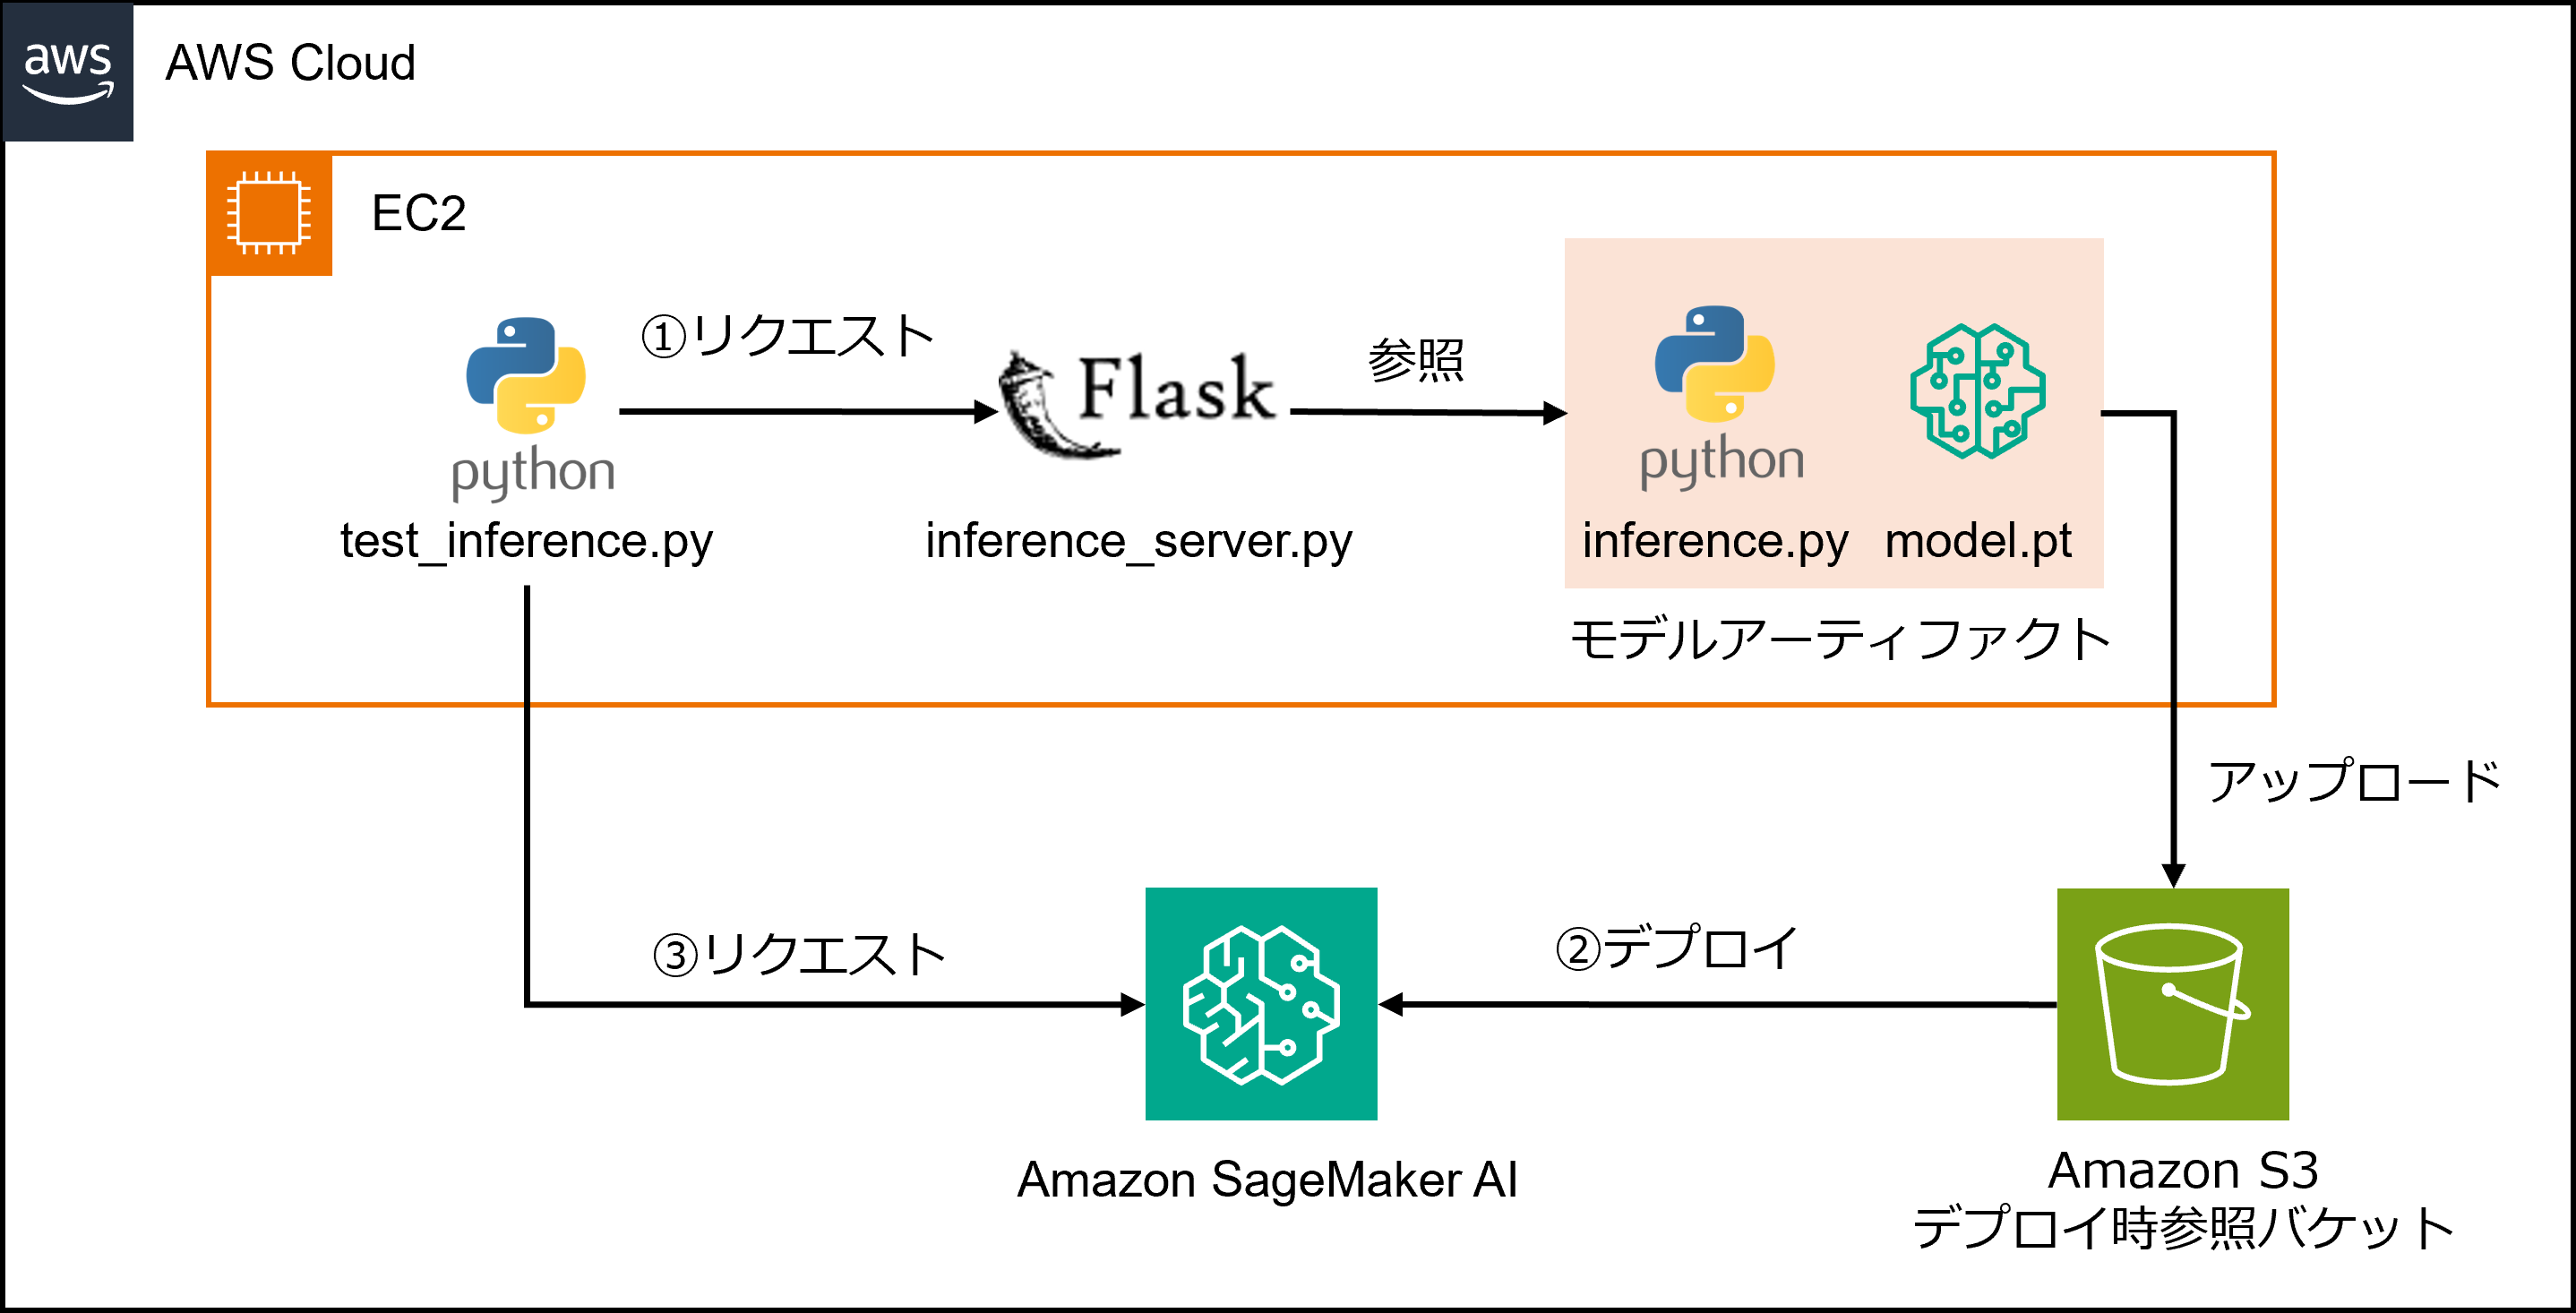
全体のイメージです。
下記のような流れで、学習済みモデルを埋め込んだアプリケーションをテストしていきます。
今回はローカル環境をEC2としていますが、MacやWindows PCに置き換えていただいても構いません。
①ローカル環境での推論サーバーへのテストリクエスト
②SageMakerエンドポイントへのモデルのデプロイ
③SageMakerエンドポイントへのテストリクエスト
プロジェクト構成
下記が今回のプロジェクトの構成になります。
(モデルアーティファクト)とあるディレクトリやファイルは最終的にSageMakerエンドポイントにデプロイする際に使われます。
yolov8
├── yolov8s.pt # デプロイ用モデル(モデルアーティファクト)
├── code # デプロイ用推論コード(モデルアーティファクト)
│   ├── inference.py
│   └── requirements.txt
├── requirements_local.txt
├── test_inference.py # テスト用推論リクエストコード
├── inference_server.py # ローカル推論サーバー
├── upload_to_s3.sh # 成果物アップロード用コード
├── deploy_sagemaker.py # エンドポイントデプロイ用コード
└── bus.jpg # テスト用画像
検証手順
検証は大きく下記に分けて実施していきます。
- 準備
- ローカル推論サーバーへのリクエスト
- SageMakerエンドポイントへのリクエスト
1. 準備
プロジェクトの作成
プロジェクトのディレクトリを作成します。
mkdir -p ~/Developments/yolov8 & cd ~/Developments/yolov8
ライブラリのインストール
ローカル環境での検証に必要なライブラリをインストールします。
requirements_local.txt(ローカル検証用)
SecurityGroup:
blinker==1.9.0
certifi==2025.8.3
charset-normalizer==3.4.3
click==8.2.1
contourpy==1.3.3
cycler==0.12.1
filelock==3.18.0
Flask==3.1.1
fonttools==4.59.0
fsspec==2025.7.0
idna==3.10
itsdangerous==2.2.0
Jinja2==3.1.6
kiwisolver==1.4.9
MarkupSafe==3.0.2
matplotlib==3.10.5
mpmath==1.3.0
networkx==3.5
numpy==2.2.6
nvidia-cublas-cu12==12.8.4.1
nvidia-cuda-cupti-cu12==12.8.90
nvidia-cuda-nvrtc-cu12==12.8.93
nvidia-cuda-runtime-cu12==12.8.90
nvidia-cudnn-cu12==9.10.2.21
nvidia-cufft-cu12==11.3.3.83
nvidia-cufile-cu12==1.13.1.3
nvidia-curand-cu12==10.3.9.90
nvidia-cusolver-cu12==11.7.3.90
nvidia-cusparse-cu12==12.5.8.93
nvidia-cusparselt-cu12==0.7.1
nvidia-nccl-cu12==2.27.3
nvidia-nvjitlink-cu12==12.8.93
nvidia-nvtx-cu12==12.8.90
opencv-python==4.12.0.88
packaging==25.0
pandas==2.3.1
pillow==11.3.0
psutil==7.0.0
py-cpuinfo==9.0.0
pyparsing==3.2.3
python-dateutil==2.9.0.post0
pytz==2025.2
PyYAML==6.0.2
requests==2.32.4
scipy==1.16.1
six==1.17.0
sympy==1.14.0
torch==2.8.0
torchvision==0.23.0
tqdm==4.67.1
triton==3.4.0
typing_extensions==4.14.1
tzdata==2025.2
ultralytics==8.3.176
ultralytics-thop==2.0.15
urllib3==2.5.0
Werkzeug==3.1.3
python -m venv ~/.venv/test-sagemaker-endpoint
source ~/.venv/test-sagemaker-endpoint/bin/activate
pip -r requirements_local.txt
※下記のrequirements.txtは後ほどデプロイ時に利用します。
requirements.txt(デプロイ用)
opencv-python
ultralytics
numpy
モデルのダウンロード
YOLOv8軽量モデルのyolov8s.ptをダウンロードして利用します。
wget https://github.com/ultralytics/assets/releases/download/v8.1.0/yolov8s.pt
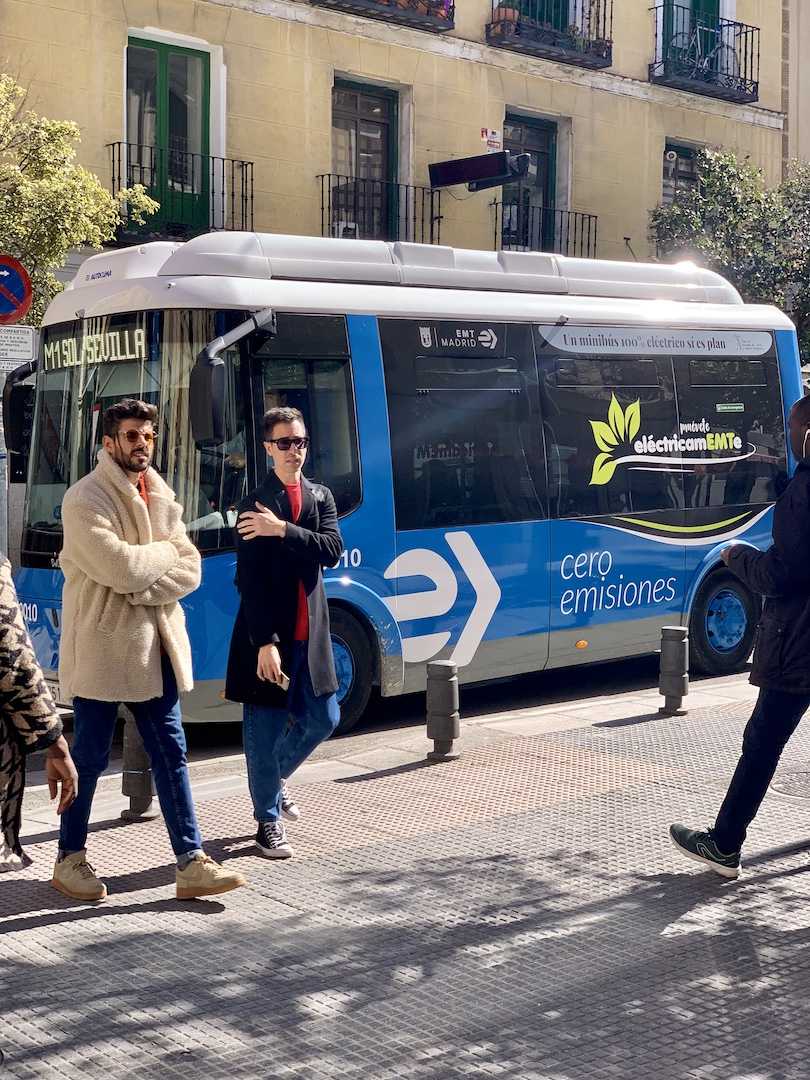
テスト画像のダウンロード
wget https://raw.githubusercontent.com/ultralytics/ultralytics/main/ultralytics/assets/bus.jpg
2. ローカル推論サーバーへのリクエスト
ローカル環境での検証では、下記ファイルを使います。
- inference.py
- inference_server.py
- test_inference.py
inference.py
実際にSageMakerエンドポイントにデプロイする際に参照される推論用のコードになります。
下記の関数を定義することでデプロイ時・リクエスト時に対応した関数をAmazon SageMakerが呼び出してくれます。
- model_fn(): デプロイ時のみモデルのロードを行う
- input_fn(): リクエスト時のリクエストデータをモデルが推論しやすいように前処理を行う
- predict_fn(): 推論を行う
- output_fn(): 推論結果の整形・リクエスト元へのレスポンスを行う
inference.py
import numpy as np
import torch
import os
import json
import base64
import cv2
import time
from ultralytics import YOLO
MODEL_NAME = 'yolov8s.pt'
DEVICE = torch.device('cuda' if torch.cuda.is_available() else 'cpu')
def model_fn(model_dir):
    print('Executing model_fn ...')
    model = YOLO(os.path.join(model_dir, MODEL_NAME))
    return model
def input_fn(request_body, request_content_type):
    print('Executing input_fn ...')
    if request_content_type == 'image/jpeg':
        jpg_as_np = np.frombuffer(request_body, dtype=np.uint8)
        img = cv2.imdecode(jpg_as_np, flags=-1)
    else:
        raise Exception('Unsupported content type: ' + request_content_type)
    return img
def predict_fn(input_data, model):
    print('Executing predict_fn ...')
    model.to(DEVICE)
    with torch.no_grad():
        result = model(input_data)
    return result
def output_fn(prediction_output, content_type):
    print('Executing output_fn ...')
    infer = {}
    class_names = None
    for result in prediction_output:
        if hasattr(result, 'names'):
            class_names = result.names
            break
    for result in prediction_output:
        if 'boxes' in result._keys and result.boxes is not None:
            boxes = result.boxes.cpu().numpy().data.tolist()
            if class_names:
                for box in boxes:
                    if len(box) > 5:
                        box[5] = class_names[int(box[5])]
            infer['boxes'] = boxes
    return json.dumps(infer)
inference_server.py
Flaskを用いてローカルの推論サーバーを立ち上げるコードになります。
推論サーバーに対してリクエストを実行することで、inference.pyで定義された4つの関数が正しく動くかを確認することができます。
inference_server.py
from flask import Flask, request, jsonify
from code.inference import model_fn, input_fn, predict_fn, output_fn
import base64
app = Flask(__name__)
MODEL_PATH = './'
MODEL = model_fn(MODEL_PATH)
@app.route('/predict', methods=['POST'])
def predict():
    data = request.get_json()
    if 'image' not in data:
        return jsonify({'error': 'No image provided'}), 400
    image_b64 = data['image']
    image_bytes = base64.b64decode(image_b64)
    img = input_fn(image_bytes, 'image/jpeg')
    result = predict_fn(img, MODEL)
    output = output_fn(result, 'application/json')
    return output, 200, {'Content-Type': 'application/json'}
if __name__ == '__main__':
    app.run(host='0.0.0.0', port=5000)
test_inference.py
推論サーバーに対して、テスト画像をインプットとしてリクエストを送るコードになります。
実行時の--endpoint引数によってローカルの推論サーバーまたはSageMakerエンドポイントかを判断してリクエストを送ります。
test_inference.py
import time
import cv2
import base64
import requests
import random
import boto3
import json
import argparse
REGION = 'ap-northeast-1'
IMAGE_PATH = 'bus.jpg'
LOCAL_DEFAULT_ENDPOINT = 'http://localhost:5000/predict'
def predict_local(api_url, resized_jpeg):
    payload = base64.b64encode(resized_jpeg).decode('utf-8')
    response = requests.post(api_url, json={'image': payload})
    response.raise_for_status()
    return response.json(), response.status_code
def predict_sagemaker(endpoint_name, resized_jpeg):
    smr = boto3.client('sagemaker-runtime', region_name=REGION)
    response = smr.invoke_endpoint(
        EndpointName=endpoint_name,
        ContentType='image/jpeg',
        Body=resized_jpeg.tobytes()
    )
    result = json.loads(response['Body'].read().decode())
    return result, response['ResponseMetadata']['HTTPStatusCode']
def main(endpoint):
    output_path = None
    orig_image = cv2.imread(IMAGE_PATH)
    if orig_image is None:
        print(f"Error: Cannot read image from {IMAGE_PATH}")
        return
    image_height, image_width, _ = orig_image.shape
    model_width, model_height = 640, 640
    x_ratio = image_width / model_width
    y_ratio = image_height / model_height
    resized_image = cv2.resize(orig_image, (model_width, model_height))
    resized_jpeg = cv2.imencode('.jpg', resized_image)[1]
    infer_start_time = time.time()
    # endpointがURL形式ならローカル推論、それ以外はSageMakerエンドポイントと判断
    if endpoint.startswith('http://') or endpoint.startswith('https://'):
        print(f"Using local endpoint: {endpoint}")
        result, status_code = predict_local(endpoint, resized_jpeg)
        output_path = 'bus_local_result.jpg'
    else:
        print(f"Using SageMaker endpoint: {endpoint}")
        result, status_code = predict_sagemaker(endpoint, resized_jpeg)
        output_path = 'bus_prod_result.jpg'
    infer_end_time = time.time()
    print(f"Status code: {status_code}")
    print(f"Inference Time = {infer_end_time - infer_start_time:.4f} seconds")
    if 'boxes' in result:
        for idx, box in enumerate(result['boxes']):
            x1, y1, x2, y2, conf, lbl = box
            x1, x2 = int(x_ratio * x1), int(x_ratio * x2)
            y1, y2 = int(y_ratio * y1), int(y_ratio * y2)
            color = (random.randint(10, 255), random.randint(10, 255), random.randint(10, 255))
            cv2.rectangle(orig_image, (x1, y1), (x2, y2), color, 4)
            cv2.putText(orig_image, f"{lbl}", (x1, y1 - 40), cv2.FONT_HERSHEY_SIMPLEX, 1, color, 2, cv2.LINE_AA)
            cv2.putText(orig_image, f"Conf: {int(conf * 100)}", (x1, y1 - 10), cv2.FONT_HERSHEY_SIMPLEX, 1, color, 2, cv2.LINE_AA)
    else:
        print("No boxes found in inference result.")
    cv2.imwrite(output_path, orig_image)
    print(f"Result saved to {output_path}")
if __name__ == '__main__':
    parser = argparse.ArgumentParser(description="Run inference locally or on SageMaker endpoint.")
    parser.add_argument('--endpoint', type=str, required=False, default=LOCAL_DEFAULT_ENDPOINT,
                        help='Endpoint URL for local or SageMaker endpoint name for deployed model')
    args = parser.parse_args()
    main(args.endpoint)
リクエストの実施
推論サーバーを立ち上げます。
python inference_server.py
# Executing model_fn ...
#  * Serving Flask app 'inference_server'
#  * Debug mode: off
# WARNING: This is a development server. Do not use it in a production deployment. Use a production WSGI server instead.
#  * Running on all addresses (0.0.0.0)
#  * Running on http://127.0.0.1:5000
#  * Running on http://10.0.0.181:5000
# Press CTRL+C to quit
#
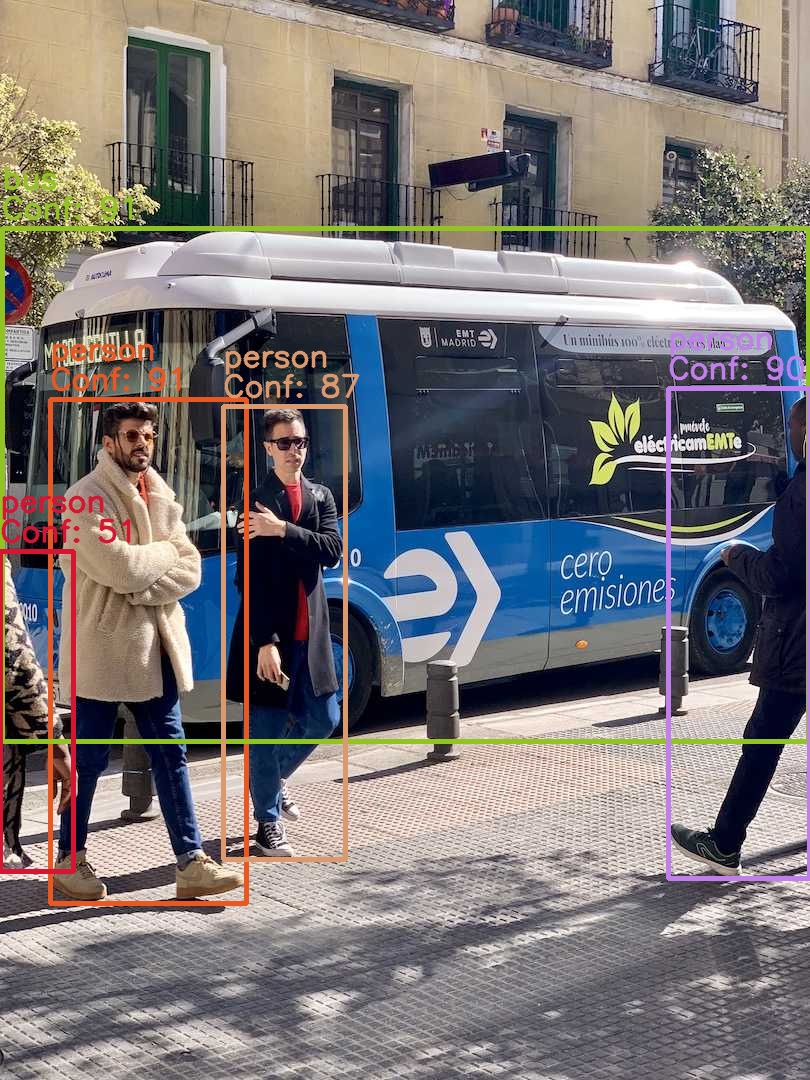
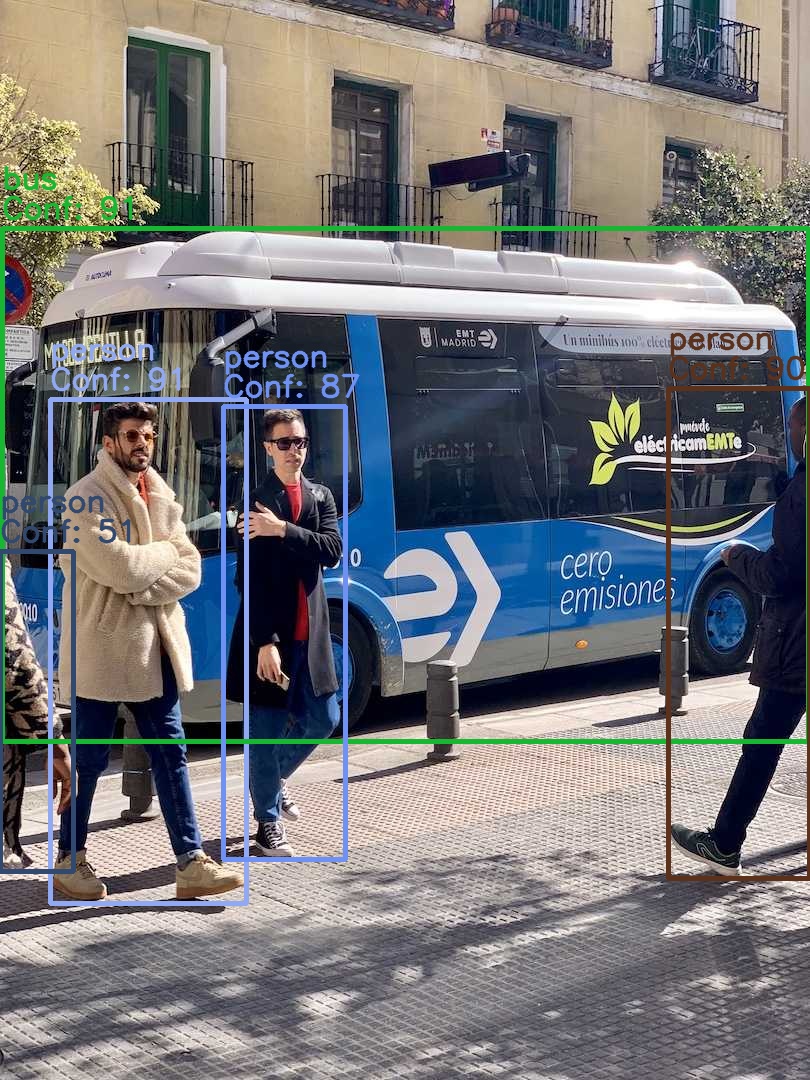
推論サーバー立ち上げ後に新しくターミナルを開いて、test_inference.pyを実行してリクエストを送ります。
bus_local_result.jpgに期待通りの座標にバウンディングボックスが描画されていれば成功です。
python test_inference.py
# Using local endpoint: http://localhost:5000/predict
# Status code: 200
# Inference Time = 0.4266 seconds
# Result saved to bus_local_result.jpg
3. SageMakerエンドポイントへのリクエスト
まずリクエスト実施する前に、SageMakerエンドポイントへモデルをデプロイするには、下記ファイルを使います。
- upload_to_s3.sh
- deploy_sagemaker.py
upload_to_s3.sh
デプロイに必要なファイルをモデルアーティファクト(model_yolov8s_obj.tar.gz)としてまとめてS3にアップロードします。
モデルアーティファクトの構成は下記になります。
model_yolov8s_obj.tar.gz
├── yolov8s.pt # デプロイ用モデル
└── code # デプロイ用推論コード
    ├── inference.py
    └── requirements.txt
下記コードでS3バケットの作成・アップロードを行っていきます。
upload_to_s3.sh
#!/bin/bash
# 設定
MODEL_NAME='yolov8s.pt'
CODE_DIR='code'
ARCHIVE_NAME='model_yolov8s_obj.tar.gz'
BUCKET_NAME='sagemaker-real-time-inference-yolov8'
S3_BUCKET="s3://$BUCKET_NAME"
S3_PREFIX='yolov8/inference-endpoint'
REGION='ap-northeast-1'
# アーカイブ作成
tar -cpzf $ARCHIVE_NAME $MODEL_NAME $CODE_DIR
# バケットの存在確認
if aws s3api head-bucket --bucket "$BUCKET_NAME" 2>/dev/null; then
    echo "S3バケット '$BUCKET_NAME' は既に存在します。"
else
    echo "S3バケット '$BUCKET_NAME' を作成します..."
    aws s3api create-bucket \
        --bucket "$BUCKET_NAME" \
        --region "$REGION" \
        --create-bucket-configuration LocationConstraint="$REGION"
    echo "バケット作成完了"
fi
# アップロード
echo "$ARCHIVE_NAME を $S3_BUCKET/$S3_PREFIX/ にアップロードします..."
aws s3 cp $ARCHIVE_NAME "$S3_BUCKET/$S3_PREFIX/"
echo "アップロード完了"
コード実行後にmodel_yolov8s_obj.tar.gzが対象のバケットにアップロードされていればデプロイの準備は完了です。
sh ./upload_to_s3.sh
# S3バケット 'sagemaker-real-time-inference-yolov8' を作成します...
# {
#     "Location": "http://sagemaker-real-time-inference-yolov8.s3.amazonaws.com/"
# }
# バケット作成完了
# model_yolov8s_obj.tar.gz を s3://sagemaker-real-time-inference-yolov8/yolov8/inference-endpoint/ にアップロードします...
# upload: ./model_yolov8s_obj.tar.gz to s3://sagemaker-real-time-inference-yolov8/yolov8/inference-endpoint/model_yolov8s_obj.tar.gz
# アップロード完了
deploy_sagemaker.py
下記デプロイ用コードを実行してSageMakerエンドポイントにモデルをデプロイします。
その際に、role変数にはSageMaker実行用のIAMロールを設定する必要があります。
deploy_sagemaker.py
import boto3
import sagemaker
from sagemaker.pytorch import PyTorchModel
from sagemaker.deserializers import JSONDeserializer
from datetime import datetime
model_name = 'yolov8s.pt'
archive_name = 'model_yolov8s_obj.tar.gz'
bucket = 'sagemaker-real-time-inference-yolov8'
prefix = 'yolov8/inference-endpoint'
model_data = f"s3://{bucket}/{prefix}/{archive_name}"
region = 'ap-northeast-1'
boto_session = boto3.Session(region_name=region)
session = sagemaker.Session(boto_session=boto_session)
role = '{SageMaker実行用IAMロールのARN}'
model = PyTorchModel(
    entry_point='inference.py',
    model_data=model_data,
    framework_version='2.3',
    py_version='py311',
    role=role,
    env={'TS_MAX_RESPONSE_SIZE':'20000000', 'YOLOV8_MODEL': model_name},
    sagemaker_session=session
)
INSTANCE_TYPE = 'ml.m5.4xlarge'
ENDPOINT_NAME = 'yolov8-pytorch-obj-' + datetime.utcnow().strftime('%Y-%m-%d-%H-%M-%S-%f')
predictor = model.deploy(
    initial_instance_count=1,
    instance_type=INSTANCE_TYPE,
    deserializer=JSONDeserializer(),
    endpoint_name=ENDPOINT_NAME
)
print(f"Deployed endpoint: {ENDPOINT_NAME}")
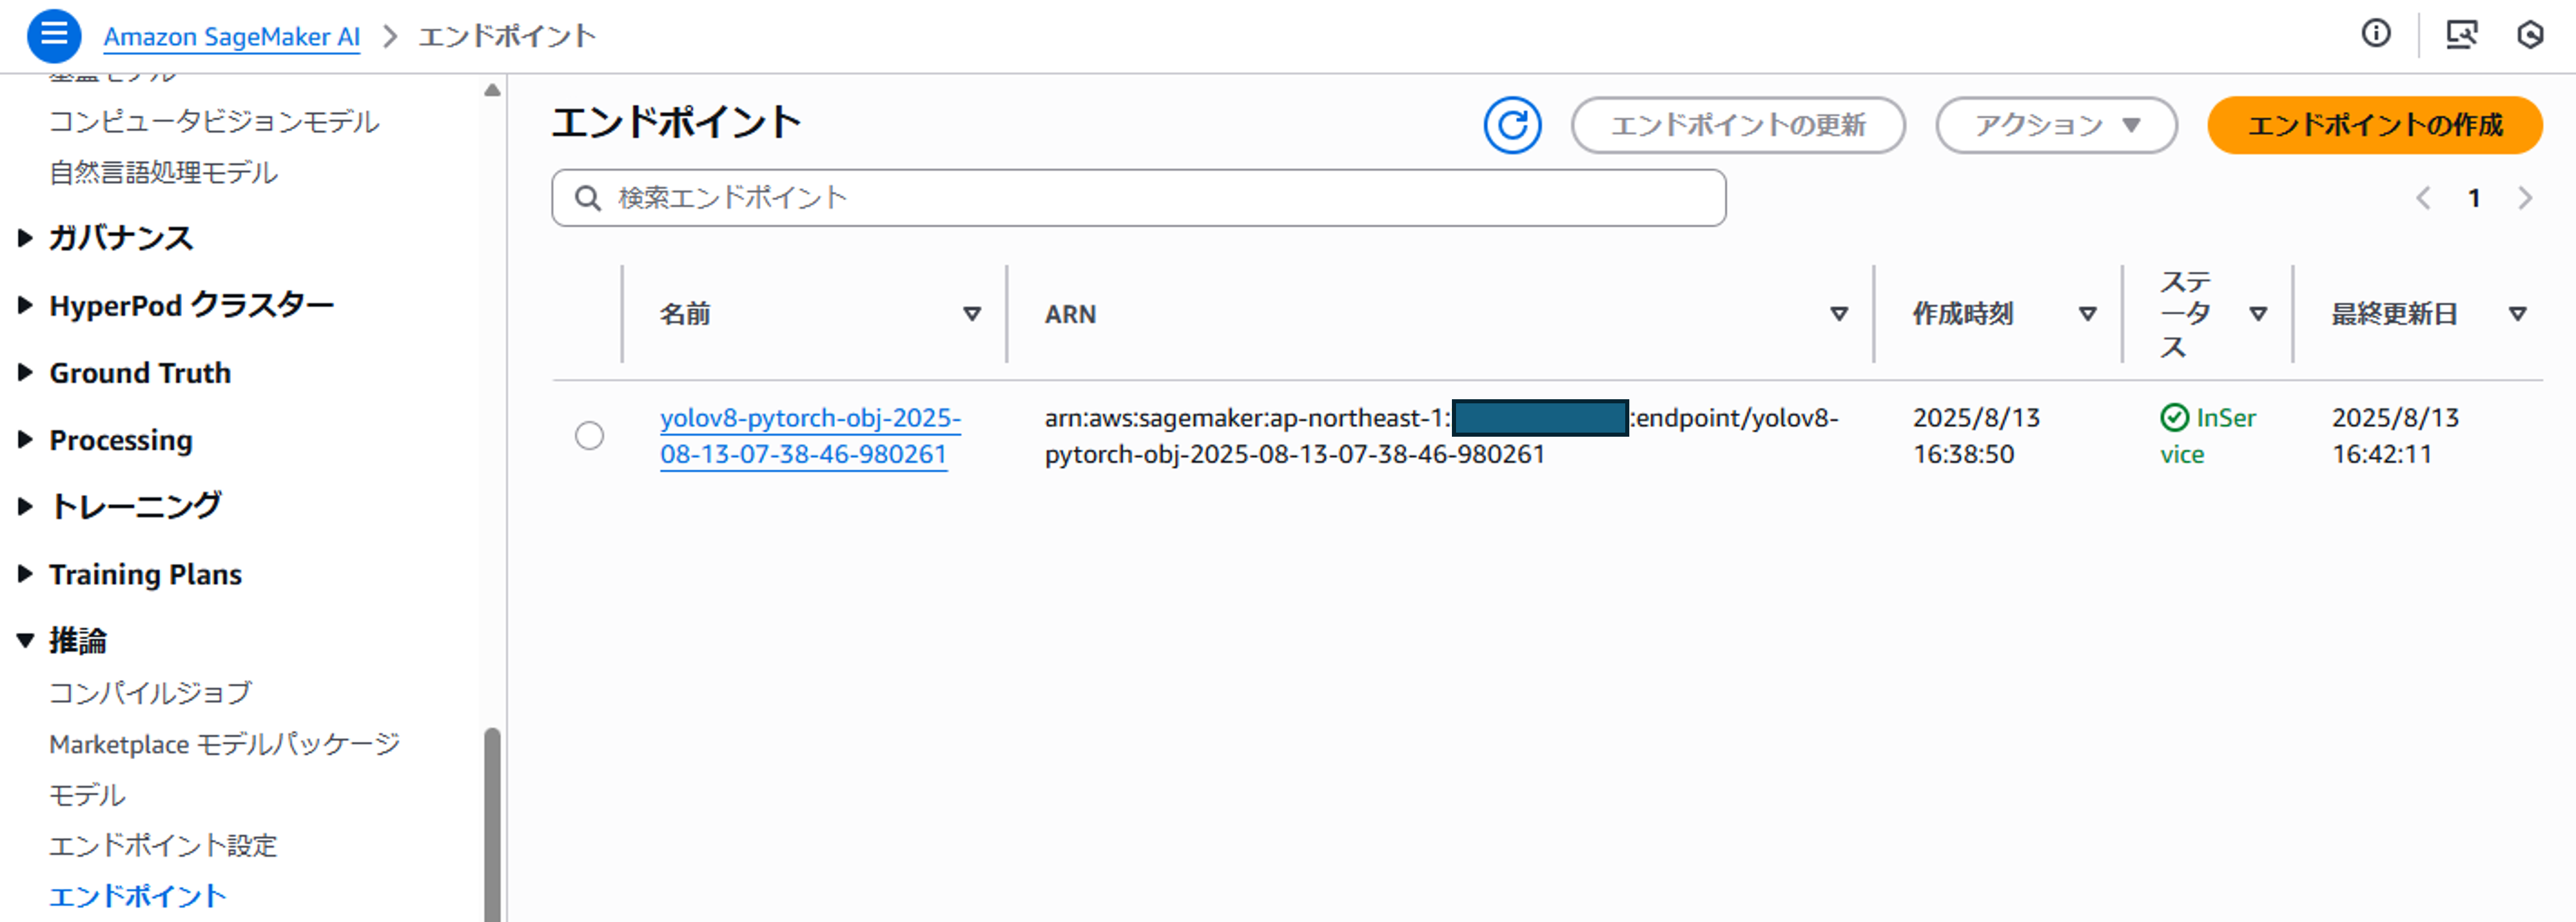
デプロイ実行後、コンソール上のSageMakerエンドポイントがInServiceになっていればデプロイ成功です。
python deploy_sagemaker.py
# sagemaker.config INFO - Not applying SDK defaults from location: /etc/xdg/sagemaker/config.yaml
# sagemaker.config INFO - Not applying SDK defaults from location: /home/ec2-user/.config/sagemaker/config.yaml
# ------!Deployed endpoint: yolov8-pytorch-obj-2025-08-13-07-38-46-980261
リクエストの実施
デプロイしたSageMakerエンドポイントに対して推論リクエストを実行します。
bus_prod_result.jpgにローカル検証時と同じ座標にバウンディングボックスが描画されていれば成功です。
※--endpointにはデプロイされたエンドポイントの名前を設定します。
python test_inference.py --endpoint {エンドポイント名}
# Using SageMaker endpoint: {エンドポイント名}
# Status code: 200
# Inference Time = 1.4651 seconds
# Result saved to bus_prod_result.jpg
まとめ
SageMakerはモデルを素早く簡単にデプロイ出来ますが、不具合時のデバッグやAIアプリケーションのカスタマイズをしたい場合には、よりサービスの理解が必要になってきます。
Amazon SageMaker JumpStartで概要をつかんだ後の次のステップとして本記事が参考になれば幸いです!
この記事は私が書きました
村上 大地
記事一覧筋トレとサウナの合間にDevOpsを学んでいます。
